Lab 1: Hello World#
Introduction#
In this lab, you will begin practicing bare-metal programming on the OrangePi RV2 board by implementing a minimal interactive shell.
This lab focuses on configuring the Universal Asynchronous Receiver-Transmitter (UART) interface for serial communication, which serves as the primary I/O channel between your host computer and the OrangePi RV2 during development. You will also gain experience in low-level system initialization, peripheral access, and basic input/output handling.
Goals of this lab#
Practice bare-metal programming.
Understand how to access OrangePi RV2’s peripherals.
Set up UART for serial communication.
Basic Exercises#
Basic Exercise 1 - Basic Initialization - 25%#
When a bare-metal program is loaded onto the OrangePi RV2, several conditions must be satisfied before it can execute correctly:
All data sections must be placed at the expected memory addresses.
The program counter must point to the correct entry address.
The
.bsssegment (which holds uninitialized global variables) must be zero-initialized.The stack pointer must be set to a valid memory location.
During boot, OrangePi RV2’s bootloader loads the kernel image into a designated physical address and begins execution from there. If your linker script is correct, the first two conditions are already handled.
However, the .bss segment and the stack pointer are not initialized automatically.
Failing to configure them properly can lead to undefined behavior, such as corrupted memory or crashes.
Todo
Initialize the system state immediately after the bootloader hands control to your program.
This includes setting up the stack pointer and zeroing out the .bss segment manually.
Basic Exercise 2 - UART Setup - 25%#
For all labs in this course, UART will be the primary interface for communication between the OrangePi RV2 and your host computer. You will use it to read input, print output, and interact with the system while debugging.
In this exercise, you will operate the UART peripheral by directly accessing its memory-mapped registers. This includes polling the status flags, reading received data, and writing data to the transmitter.
Refer to the OrangePi RV2’s hardware documentation for details on the base address and layout of the UART registers.
Todo
Implement the UART I/O functions on OrangePi RV2. This includes accessing the UART registers to poll the line status, retrieve input characters, and transmit output characters.
Note
For details regarding the OrangePi RV2’s UART address and layout of the UART registers, please refer to SoC User Manual (specifically sections 6.2 and 16.3).
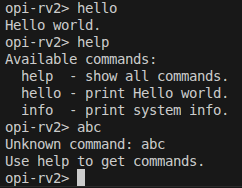
Basic Exercise 3 - Simple Shell - 25%#
Once UART is configured correctly, you can build a simple shell interface to enable basic interaction between the OrangePi RV2 and your host computer.
The shell should process user input received via UART and respond with predefined messages. At minimum, it must support the following commands:
help: Display a list of available commands.hello: Display the message “Hello World!”
You may implement a simple command parser that reads input character by character, identifies complete commands, and prints the corresponding output.
The expected result is shown below:
Important
Be mindful of character alignment issues when handling screen I/O.
Consider translating newline characters (\n) into carriage return + newline (\r\n)
to ensure proper display across different serial terminals.
Todo
Implement a basic shell that reads input from UART and displays output accordingly. The shell should recognize the listed commands and print appropriate responses.
Basic Exercise 4 - System Information - 35%#
Interacting with low-level system firmware is a key aspect of bare-metal development on RISC-V platforms.
In this exercise, you will implement a general-purpose SBI (Supervisor Binary Interface) call wrapper and use it to query basic system information from OpenSBI. This includes retrieving the current hardware thread ID (hart ID) and the OpenSBI version specification.
- You will:
Implement the
sbi_ecall(...)function in C using inline assembly.Use the RISC-V standard extension SBI_EXT_BASE to obtain:
Current hart ID
OpenSBI spec version
Integrate the results into your shell (e.g., via info command).
SBI Call Design#
OpenSBI exposes system services to supervisor-mode software through a standardized calling convention using the ecall instruction.
You will implement a generic function:
struct sbiret sbi_ecall(int ext, int fid,
                        unsigned long arg0,
                        unsigned long arg1,
                        unsigned long arg2,
                        unsigned long arg3,
                        unsigned long arg4,
                        unsigned long arg5);
This function uses inline assembly to load arguments into the appropriate RISC-V registers a0 to a7,
executes the ecall instruction,
and retrieves the result from registers a0 (error code) and a1 (return value).
For a reference implementation in the Linux kernel,
see sbi_ecall in the Linux 6.6 source.
Todo
Implement sbi_ecall(...) using inline assembly.
Test it by calling the following SBI functions with
Extension ID 0x10 (SBI_EXT_BASE):
Function ID
0x0:sbi_get_spec_version(): returns OpenSBI versionFunction ID
0x1:sbi_get_impl_id(): returns implementation IDFunction ID
0x2:sbi_get_impl_version(): returns implementation version
After implementing sbi_ecall(...), use it to support a new shell command info
that displays the following information on the OrangePi RV2 board:
OpenSBI specification version
Implementation ID
Implementation version
To print formatted results in your shell, you may implement a minimal printf-like function,
or use your existing UART output routine with manual formatting.
info will serve as your first system-level introspection tool and should include SBI-based results.
The expected output of the info command is shown below:

Note
For more detail of RISC-V SBI, please refer to RISC-V SBI Reference